First Day At Invariant School
Going from 0 to 1 with invariant testing
A Lay Of The Fuzzing Landscape
With the rise in popularity of using invariant testing for finding hidden bugs in Solidity contracts with fuzzing and formal verification, many are eager to get started but don’t know where. In this post we’ll see how evaluating invariants is just another form of testing that requires some additional setup.
To get started with invariant testing you need to understand two key details that are unique to it:
Scaffolding
Defining Invariants
Scaffolding is the process of adding the necessary functions and system setup that allows the fuzzer to execute random call sequences on your contracts. Using this setup, we define the invariants, which are statements about the system that should always be true.
The fuzzer will use your scaffolding to look for a sequence of calls with specific parameters for which any of your defined invariants is not true. If the fuzzer finds such a sequence, then it’s likely you have a bug on your hands.
In this post we’ll see how to scaffold a repo and get a taste of the power of fuzzing by evaluating an invariant we define on it.
Let’s get fuzzy.
To Build A House You Need Scaffolding
Before we can actually execute invariant tests, we need something for them to stand on, a way for them to hook into our system and manipulate its state.
This is the least glamorous and most repetitive part of the process which is why the first tool we built at Recon helps with this. Our Builder gives you an automated way to add all the publicly visible functions from your system’s contracts in a repository to a scaffolding. You also get all the necessary helper contracts to keep your test suite organized and easily maintainable using a standardized format.
Echidna, Medusa and Foundry have unique requirements in how they require their invariant tests to be set up. This means we need a standard interface to allow us to use all three tools, which we get from the Chimera framework and the Builder automatically adds to our setup.
In theory, each of the above mentioned invariant testing tools works by calling contract functions with random values and verifying if a defined invariant holds or not. In practice however, because the process of calling functions with random values is computationally intensive, it’s vital to choose specific entry points into the system which actually modify state variable values (non-view functions) for better division of limited computational resources.
Building A Test Scaffolding
We’ll now walk through how to use the Builder to attach an invariant testing scaffolding (harness) to an existing Foundry project using Recon for this simplified repo.
For our example we’ll use the Echidna fuzzer by Trail of Bits since it’s battle tested and has widespread adoption. But the setup we get from the Builder will also work for Medusa and Foundry invariant testing.
To use the Builder, all we need to do is paste the link to our GitHub repo in the form in the Add Repos tab and click Start Job.
In the job that gets created the Recon Builder will scrape the ABI of all the contracts in the repo and look for public, non-view functions.
This step should work for the majority of public Foundry repos but if you’re following along with your own repo and have difficulty getting your repo to build, check if it falls under the category of a nonstandard repo in this post and follow the subsequent steps described there for building. If you’re still having trouble, reach out to our team on our discord and we’d be happy to help you troubleshoot!
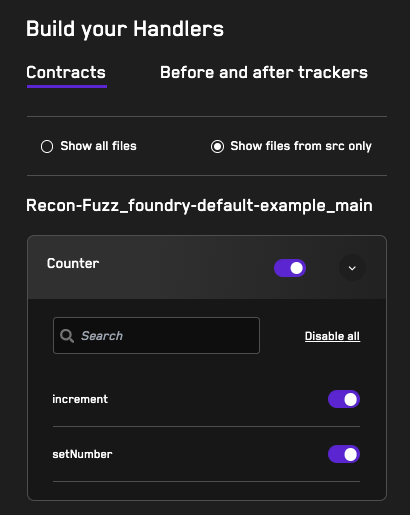
After the job is complete, our repo will show up in the Build Your Handlers tab where we select the functions that we want to allow the fuzzer to use as entry points into the system.

TargetFunctions contract.For our example we’ll select the only two public facing, state-changing functions (increment and setNumber) from our Counter contract which give us a TargetFunctions contract that looks like this:

To use the target functions in our repo, we’ll need to download the above contract along with other helpers from the Build Your Handlers page using the Download all files button.
The other files that we download take care of all necessary test setup and inheritance.
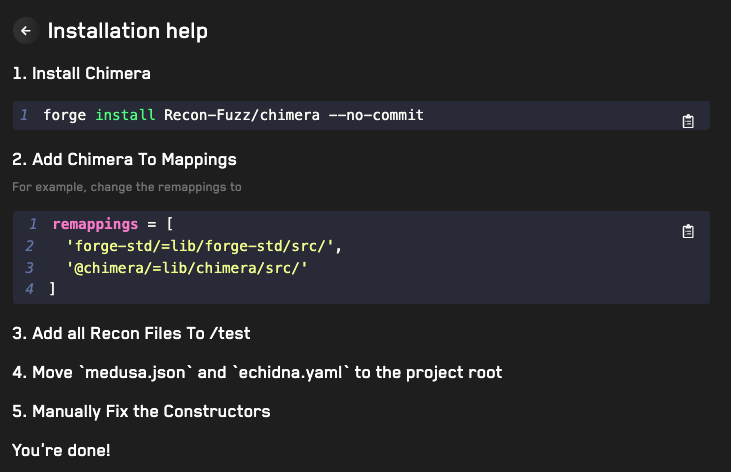
All that’s left to do now is follow the steps on the Installation Help page to add and manage the necessary dependencies.

After following these steps, we can compile our repo using forge build to make sure all the steps were correctly executed. If your repo doesn’t compile, try repeating the steps above or viewing the Common Build Issues section of this post.
We’re now halfway to testing our invariants!
Defining The Invariants
With our target functions scaffolded we have everything we need for the fuzzer to start making calls into our system so that it can change the state in the same way a user or attacker would.
The more interesting part of defining invariants is where we make an assertion about our system in code and allow the fuzzer to verify if the statement holds for a number of test cases.
We define our invariants using things like documentation and comments that outline the expected behavior of the system, which we then compare against its actual behavior.
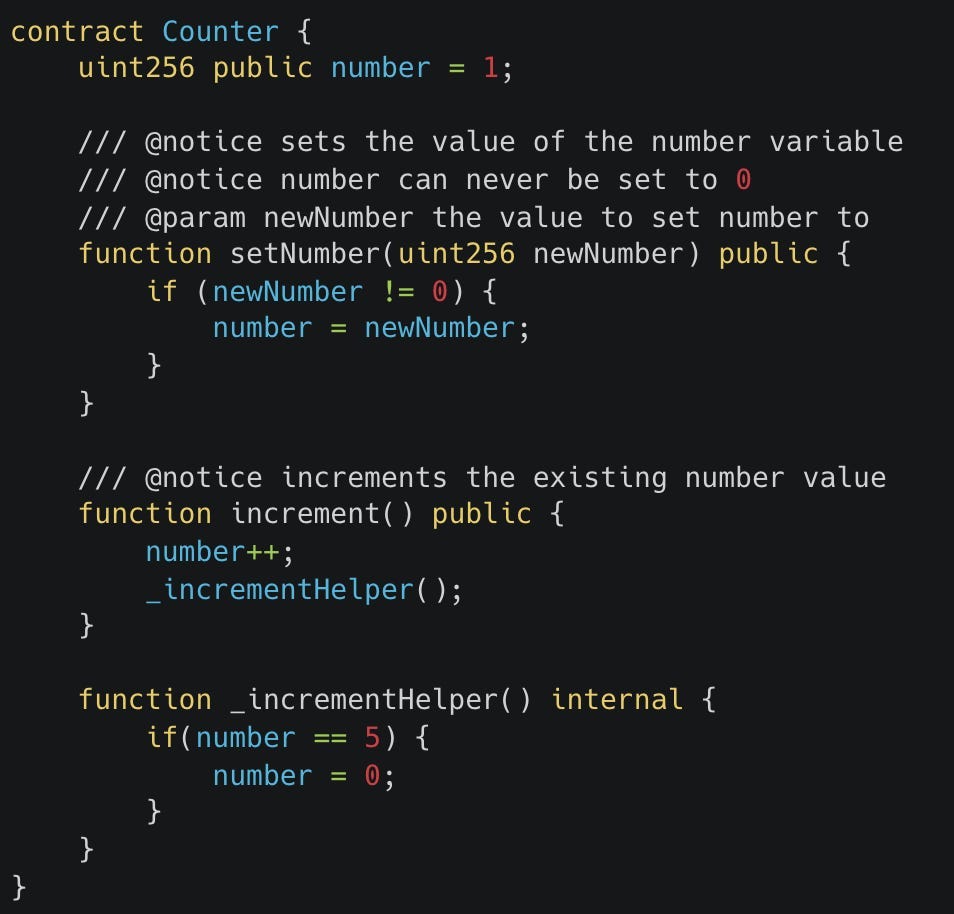
In our case, looking at the only contract in our system (Counter):
From the NatSpec above the setNumber function we can see that there’s an implicit assumption that: “the number variable can never be set to 0”.
Knowing that an invariant is a statement about the system that should always hold true, often defining behavior that always should happen or never happen, we can use this plain English statement as a definition of our first system invariant.
We define this invariant in the Properties contract that gets created for us when we use the Recon Builder:
This invariant is defined as an Echidna boolean property; see this readme to learn more about the testing modes Echidna supports and how to define them.
Echidna/Medusa will test this invariant after every call to one of the functions defined in our TargetFunctions contract by checking the return value of the function. If the crytic_counter_never_zero function returns true it means the invariant holds for a given call, if it returns false, it means that the fuzzer has found a call sequence that has broken the invariant and will subsequently display this via logs in the console.
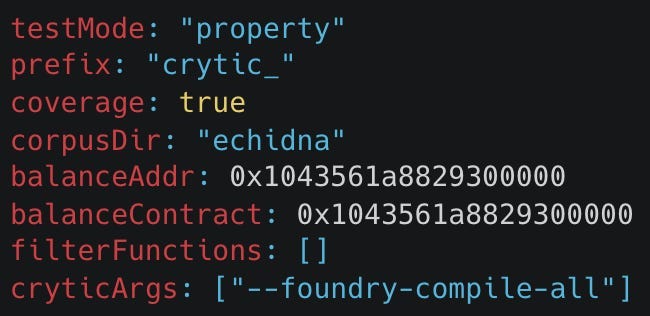
Because there are different testing modes that the fuzzer can use, we need to have the correct one switched on for the fuzzer to specifically check boolean properties. For Echidna this is just a matter of changing the testMode to “property” as shown here in the echidna.yaml configuration file:

Let ‘er Rip
We now have everything we need for the fuzzer to test if the invariant we’ve defined holds by trying call sequences with random inputs to our TargetFunctions. This is a fuzzing run, or job, and it’s where the magic of fuzzing happens.
Before running it’s worth noting that the inheritance structure of the contracts created by the Recon Builder will make all of our target functions appear to be called on an instance of the CryticTester contract but this contract really just acts as the entry point, the contracts actually being called underneath are those called in the TargetFunctions contract, in our case the Counter contract.
To fire up our fuzzer we can use the following command defined in the CryticTester contract while cd’d into the root of the repo:
echidna . --contract CryticTester --config echidna.yamlThis will execute 50,000 tests, the default testLimit for Echidna, with each test trying a different combination of target function calls with different inputs.
Because our test contract logic is trivially simple, within a couple of seconds Echidna is able to find a call sequence that causes the crytic_counter_never_zero invariant test to return false and we can see the call sequence output in our console:

With a call sequence that breaks one of the properties in hand we can use the Recon reproducer tool to turn the call sequence into a Foundry unit test. Adding this unit test to our repository then allows better debugging using all the tools offered by Foundry to help us identify the source of the issue.
In our case we can use a unit test to look more closely at the logic of the Counter we were targeting and can see that the _incrementHelper function is what breaks the assumption made in our defined invariant because it allows the number variable to be set to 0.
Wrapping Up
In this article, we’ve looked at how we can use the Recon Builder tool to scaffold our invariant tests so that we don’t have to make design decisions about our testing setup.
The Builder allows us to easily identify all public/external state-changing functions in all contracts in the repo and decide which we’d like to add to our test suite. Without this we’d need to manually sort through our contracts of interest and decide how to structure our test suite so that the fuzzer can access these state-changing functions.
Next, we looked at how we first define invariants for our system in plain English, using our knowledge of how the system should work, gathered from comments and documentation. This was then converted into an easy to understand invariant (using the Echidna boolean property format) which will be checked by the fuzzer after every call to our target functions.
If the fuzzer finds a call sequence that causes the defined invariant function to return false it will output a breaking call sequence in the logs in the terminal window which can be used to identify the cause of the broken invariant.
One of the great benefits of having an invariant testing suite defined on a system is that it allows us to continuously check any changes in a codebase against the existing invariants. This is especially helpful for mitigations.
In the above example you can try implementing a change to the Counter contract to make it actually conform to the invariant we’ve defined on it and try running the tests against it. Can you get all the tests to pass?
Huge thanks to @alcueca for his editorial help and feedback for this article!
If you've made it this far you value the security of your protocol.
At Recon we offer boutique audits powered by invariant testing. With this you get the best of both worlds, a security audit done by an elite researcher paired with a cutting edge invariant testing suite.
Sound interesting? Reach out to us here:


Thanks for the information!
Great article. Look forward to a Second Day at Invariant School! Would be keen to help write it up if helpful at all :)