
Fuzzing in the Cloud
A review of the different cloud based options for fuzzing Solidity contracts

Introduction
Fuzzing by its nature is a computationally resource intensive task, requiring many hours (and often days/weeks) to achieve sufficient logical coverage to provide a strong guarantee that properties hold under all possible system states. This is why it’s often advantageous to offload these long duration fuzzing runs to a separate machine where they can run uninterrupted without having to fight for computational resources with your local machine and subsequently increasing the risk that a run would crash as a result.
There are two primary options for offloading these types of long duration runs:
Have a separate machine in your possession on which you can perform your runs.
Upload them to a remote machine on a cloud service.
with the primary benefits of using a cloud service being that you can access enterprise level hardware that’s more performant for your runs at a fraction of the cost of owning it.
In this post we’ll look at the different options available for executing cloud fuzzing runs along with the benefits and tradeoffs of each.
For a fair comparison across the different cloud fuzzing options we’ll use a modified version of the create-chimera-app repository with added failing assertions as a benchmark as it allows us to execute invariant tests with Echidna, Medusa and Foundry.
A look at the options
With the vast number of cloud service providers that exist there are nearly infinite ways to setup a cloud fuzzing environment, so to keep things simple in this post we’ll look at the primary methods most security researchers use from the most involved (requiring knowledge of provisioning cloud resources) to the simplest (only requiring knowledge of the fuzzing tool being used):
Fuzzing on DigitalOcean with CloudExec
Fuzzing with GitHub CI
Fuzzing on Consensys
Fuzzing with Recon
Fuzzing on DigitalOcean with CloudExec
Difficulty: medium
Background required: yes (knowledge of setting up/managing cloud resources)
Ease of Setup: 4/10 (most setup is related to configuring the runner)
CloudeExec is Trail of Bits’ tool for running general purpose computation jobs in the DigitalOcean cloud via the command line. Under the hood it sets up a server with any dependencies passed in the setup bash script and stores output data and logs to digital ocean’s object storage (called Spaces, equivalent to an AWS S3 bucket). Additionally, when the job is completed it automatically destroys the server to not incur additional usage costs.
The Getting Started section of the CloudExec README describes the needed steps to download the CloudExec CLI tool so that you can upload jobs to DigitalOcean from your terminal.
After downloading the tool you’ll need to create a DigitalOcean account if you don’t already have one and create a Spaces bucket to point CloudExec to, allowing it to write output data and logs from your fuzzing run to it. You’ll also need to create an access token to allow CloudExec to provision new server instances using your account.
To set the credentials for your created Spaces bucket and access token for CloudExec you’ll need to run:
cloudexec configureand follow the command line prompts to pass in the required configuration data.
After doing so, running:
cloudexec checkwill verify if you have configured CloudExec to access your DigitalOcean resources correctly.
If the checks above pass you can configure a new job for a project using:
cloudexec initwhich creates a new cloudexec.toml configuration file in the current directory.
For our benchmark we’ll use the following configuration added to the create-chimera-app repo:

with CloudExec configured we can run our job using:
cloudexec launchand by running
cloudexec logswe can see an output of the logs of the VM that CloudExec spins up for us on DigitalOcean:

which also get stored in the Spaces Object Storage bucket with the job number specified in the url. We can then share these output logs with collaborators using the Quick Share option on the cloudexec.log object in our bucket:

which gives us a shareable link to the output logs of the entire run.
It should be noted that if you forget to delete your Spaces storage bucket after you have completed your fuzzing campaign, you’ll still incur costs for maintaining an active resource on DigitalOcean, while the Droplet compute resources will automatically be destroyed after a job is complete and will therefore not incur maintenance costs.
Fuzzing with GitHub CI
Difficulty: medium
Background required: yes (understanding GitHub actions configuration setup and handling dependencies)
Ease of Setup: 6/10 (some setup required)
GitHub actions can allow us to setup a hosted runner to execute an Echidna job every time we make a commit to a repository. GitHub-hosted runners are VMs hosted by GitHub to which we’ll add Echidna as an application and GitHub will handle machine maintenance and upgrades of the VM.
All we need to do is provide a configuration file to the GitHub runner setup and it will handle provisioning a new VM for each job we start and decommission it when the job is completed (see this guide to learn more about GitHub hosted runners).
Trail of Bits (the maintainers of Echidna and Medusa) have already created a repository with a GitHub action setup that triggers running Echidna here. Using the GitHub Action configuration file they provide, all we need to do is make some small changes so that it runs Echidna with the same command as defined in the create-chimera-app README and add this file to the root of our repository in a .github/workflows directory.
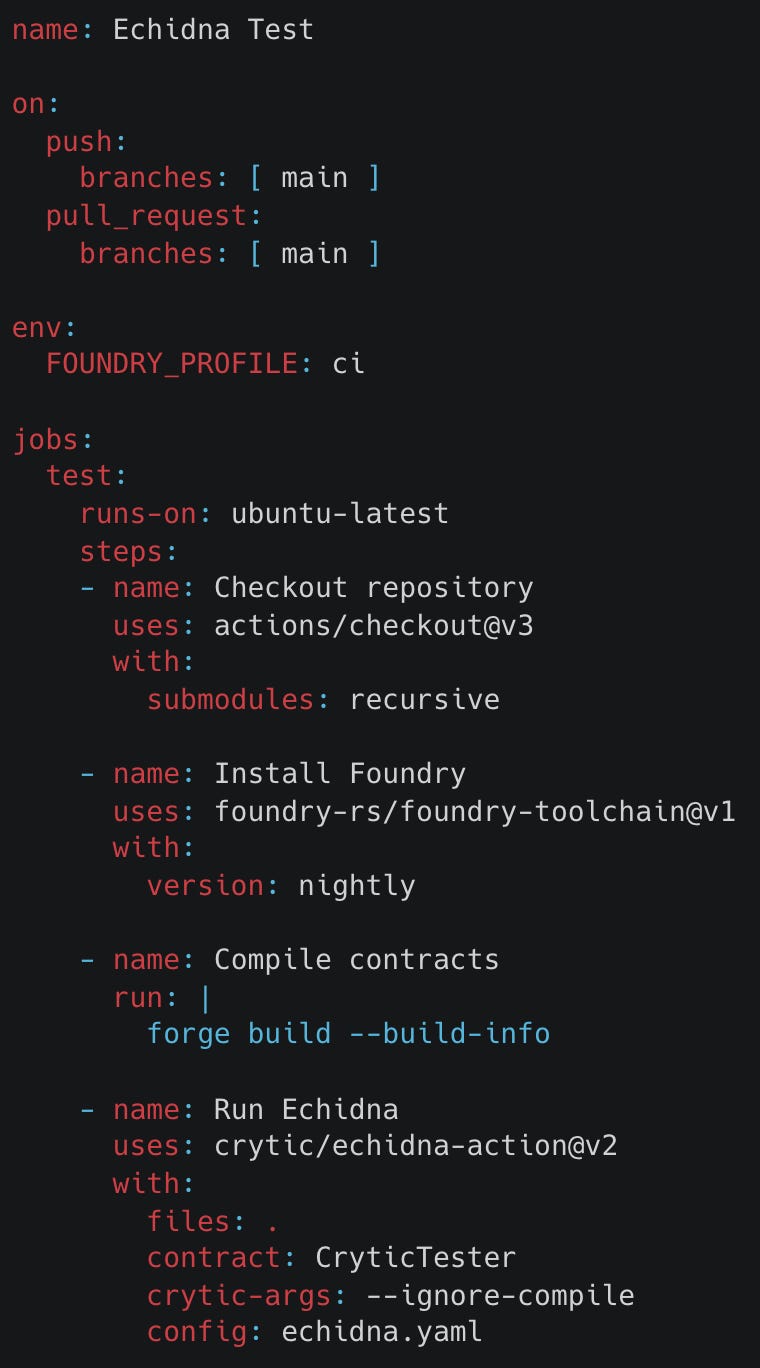
And now every time we make a PR or commit to the main branch of our repo, this action will trigger an Echidna job on it.
On analyzing the results of a test run, the workflow step for the Echidna run itself takes only 43 seconds to execute 50000 calls if there are no failing tests.
If we introduce a failing test we can see that the “Run Echidna” step fails and the failing test is visible in the GitHub action job details with the counterexample:
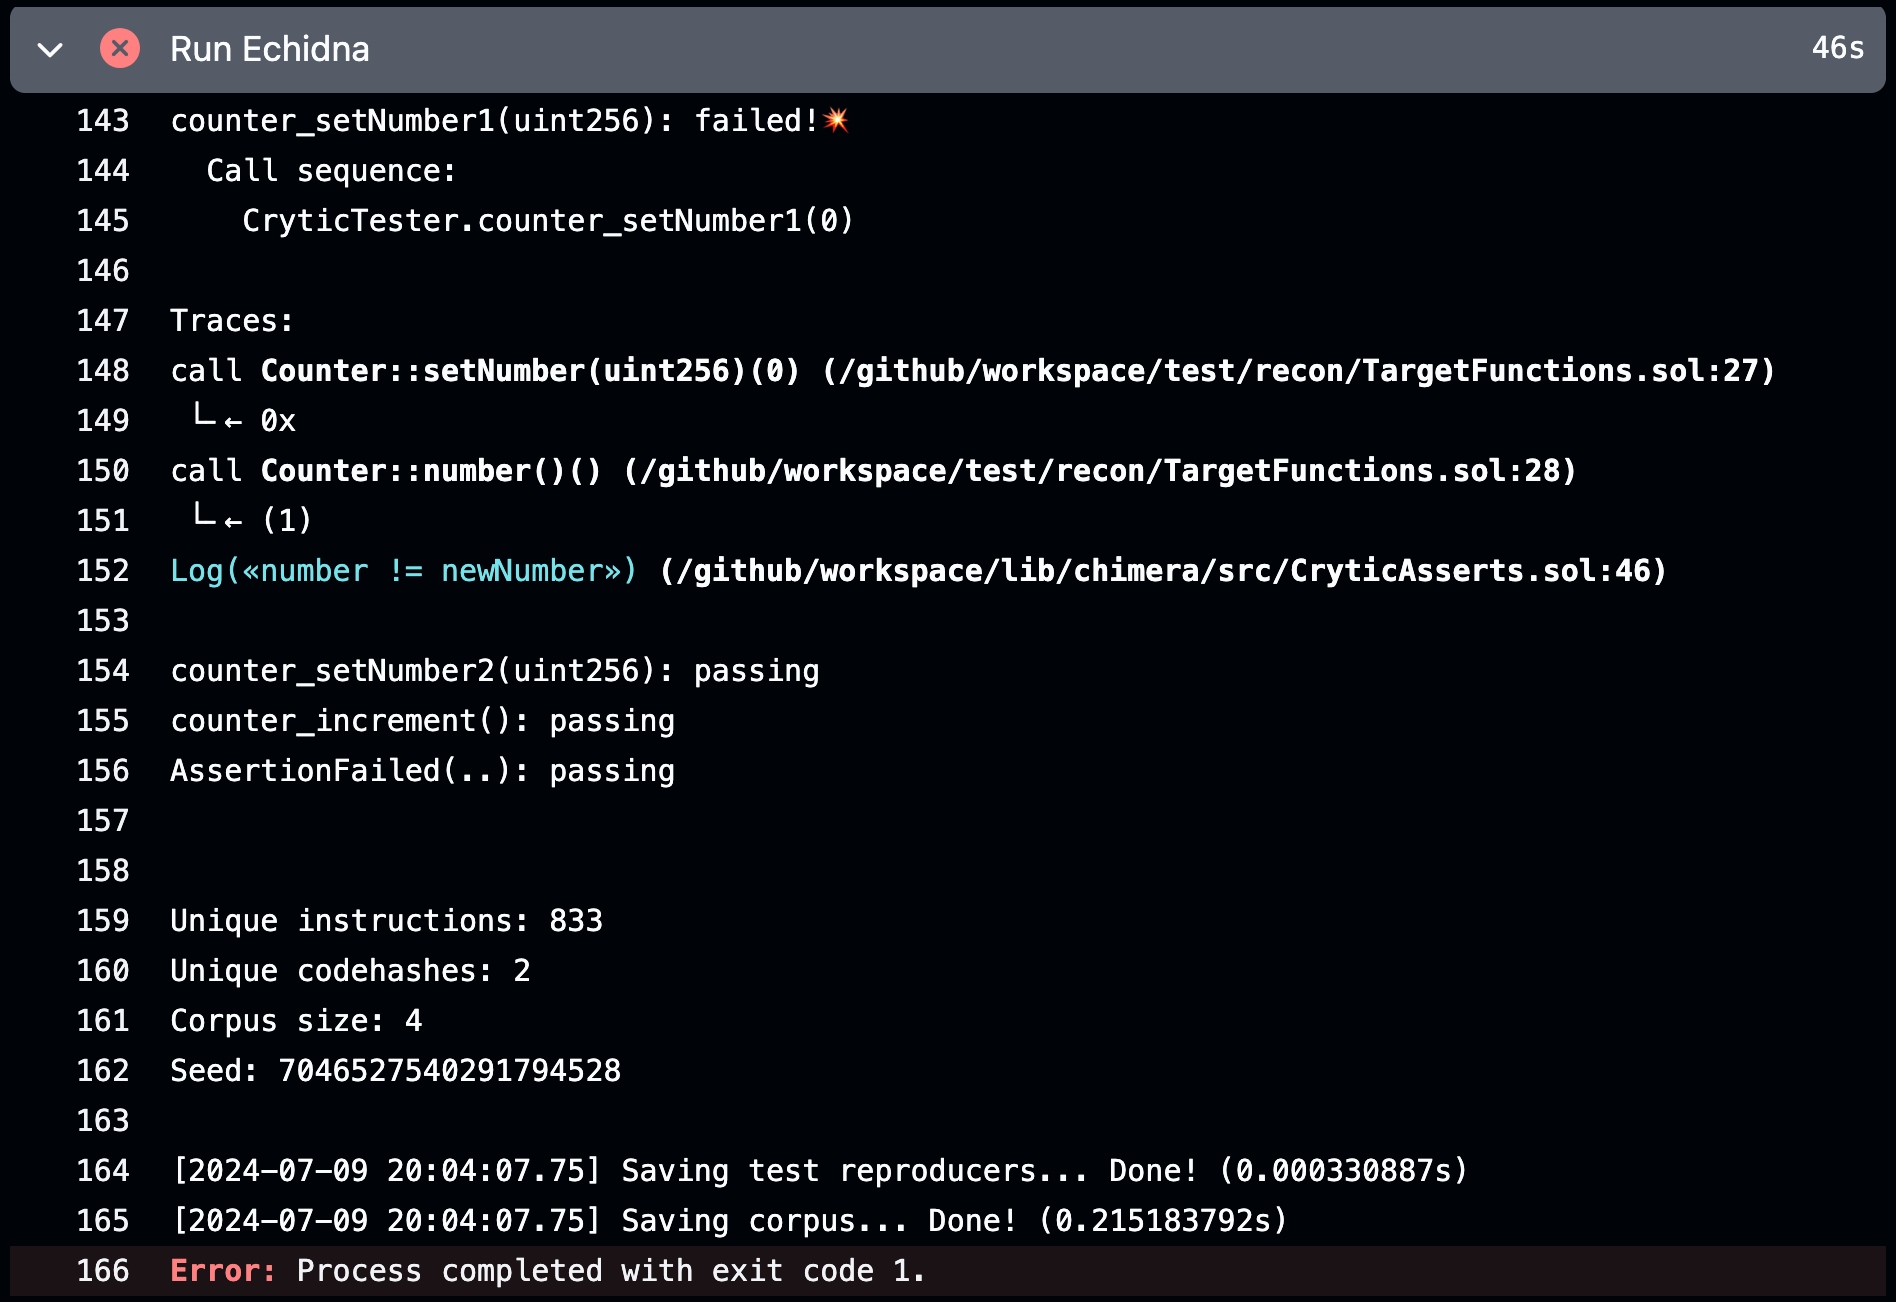
We can additionally save the corpus and reproducers in the repo by modifying the workflow configuration file to include an output-file configuration so that we can reproduce the failing test locally for debugging. We can then also share the link to the failing test with anyone who has access to the repository.
Overall Github allows easily implementing all functionality for Echidna/Medusa with the main trade-off being the time it can take to setup additional features such as corpus re-use or fork-testing.
Fuzzing on Consensys
Difficulty: low
Background required: no (some understanding of Python environments can be helpful)
Ease of Setup: 7/10 (some setup required)
The Consensys Fuzzing tool allows you to run stateless fuzzing and stateful invariant tests for Foundry stateless fuzzing and invariant jobs.
Unlike Echidna/Medusa, which use special functions which return a boolean value to evaluate an invariant, Foundry invariant tests use assertions from the forge standard library, so we have to write a new invariant test to replicate the assertions in our previous examples that can be checked by Foundry which we add to the CryticToFoundry contract:

Following this guide, we can see that setting up a fuzzing run with Consensys Fuzzing is pretty straightforward. All we need to do is install the diligence-fuzzing CLI tool using:
pip3 install diligence-fuzzing Then create an API key for the CLI using the UI which we add locally with the following command (remembering to add the .env to our gitignore so our API key doesn’t get committed if we push to our remote repo):
echo FUZZ_API_KEY='your api key here' > .envWe then run our job using
fuzz forge testwhich uploads it to the Consensys Fuzzing cloud runner.
The cloud runner dashboard then provides us metrics about our fuzz run while it’s ongoing and results about failing properties at the end of our run.

The coverage plot is helpful for visualizing when coverage may be blocked by how we’ve defined our fuzz tests (often an indicator that they require clamping of input values) or acting as an indirect indicator that certain paths aren’t reached by our tests and they should therefore be expanded to include these paths.
Looking at the results more closely we can see that the invariant that we defined is highlighted as failing here as a Foundry invariant test (where the green indicator next to the line number indicates lines covered by the fuzzer):

On expanding the details for the failing assertion we can see the call sequence that causes it to fail:

Overall the Consensys Fuzzing option provides a simple setup for running long-duration Foundry invariants tests with an intuitive UI. Additionally, similar to Echidna/Medusa, Consensys Fuzzing allows Foundry corpus reuse (outlined here) to allow you to gradually build up line/logical coverage over multiple runs. Using the free tier your fuzzing runs are capped at 5 minutes, but with the Builder Pro plan you have access to uncapped fuzzing runs and can use up to 2 cores on the machine on which your job is run, allowing parallel fuzzing and faster runs.
Since Consensys Fuzzing lacks support for Echidna and Medusa, if your test suite it setup to only use these you’ll need to refactor it to be compatible with it, or use create-chimera-app to easily allow working with all three.
Fuzzing with Recon
Difficulty: low
Background required: no
Ease of Setup: 9/10 (some setup required for private repos)
Recon was created to simplify the process of implementing and running invariant tests for Solidity smart contracts. As a result our tools provide a way to setup your invariant tests and also run them for extended periods in the cloud.
To run a job on the Recon cloud runner it must be using the Foundry framework (Hardhat + Foundry repos are also supported by choosing the custom pre-install process: yarn install —ignore-scripts on the Jobs setup page) and you must be signed up for a Pro account.
If the repo you want to run the job on is public you can start your job by navigating to the Jobs page and selecting which fuzzer to use for running your job (Echidna, Medusa or Foundry) and paste in the link to your repo from the branch you want to test:

Note: for private repos see this guide on how to first grant Recon read access to your repository.
On the right-hand-side menu all we need to do is specify the Echidna config file which provides the runner with all the necessary configurations for executing our tests:

After clicking the Run Job button the job is uploaded to Recon’s cloud runner and we can see details about the job logs and coverage report by clicking the View Details button for the job from the All Jobs list:

After our job completes we can see on this page where our assertion failed in the logs and automatically get a Foundry test generated from the resulting failure which we can add back into our project and use for local testing to identify the root cause of the issue. Additionally, we can easily share the results of our run with anyone using the Share Job Results button and use the Download Corpus button to replay the evaluated call sequences on our local machine. We can also build up a corpus over multiple runs by passing the job ID of the job whose corpus we want to use in the Corpus Re-use Job ID field.
Conclusion
As we’ve seen, there are many options for running fuzzing jobs in the cloud, with each having its own trade-offs in terms of ease of use and abstraction that one has to deal with when running a job on them.
Over the course of writing this post I also tried to implement the least abstract setup of running fuzzing jobs via a docker container on AWS Fargate but after many hours (at least 7+) and much frustration I finally gave up. While I’m certainly no cloud wizard, I do have a CCP certification from AWS and have basic competency in their cloud from experience, but having to go down a whole new rabbit hole of understanding docker containers and deploying them on AWS when ultimately it wasn’t my main objective was an experience I hope to not have again anytime soon.
This experience with AWS is why the Recon team has built our tools, because we found ourselves spending more time getting test suites and runners setup than actually running them. We then recognized that the frustration and time spent doing this was probably experienced by anyone else trying to perform invariant testing on a protocol and as a result less people would implement them, leading to more protocol exploits and making crypto as a whole a less safe place.
This is why Recon exists and why we’re still working to improve it every day so if you have questions or suggestions feel free to reach out in our discord server.
If you've made it this far you value the security of your protocol.
At Recon we offer boutique audits powered by invariant testing. With this you get the best of both worlds, a security audit done by an elite researcher paired with a cutting edge invariant testing suite.
Sound interesting? Reach out to us here:
